Theme Notes
-
Installing The ThemeOption 1:
- The theme you purchased is a .dmg (disk image) file. To mount the disk image on your desktop double click it.
- Locate the theme file in the folder (The file will have a ".rwtheme" extension) and double-click it.
- Restart Rapidweaver.
- The theme you purchased is a .dmg (disk image) file. To mount the disk image on your desktop double click it.
- Open a Finder window and go to the
"~/Library/ Application Support/ Rapidweaver/" directory. - Locate the theme file in the folder (The file will have a ".rwtheme" extension) and drag and drop it into the
"~/Library/ Application Support/ Rapidweaver/" directory. - Start Rapidweaver.
-
Can MSIE display a colour gradient and a shadow for the same container?The short answer is No (at least up to MSIE8).
MSIE cannot display both dolour gradient and shadow for the same container at the same time.
What happens is that the shadow style selection takes over and MSIE only displays a solid colour for the selected container.
The solid colour displayed is the colour chosen for the bottom of the container.
For example if you want the page header to have Red (FF0000) at the top and Orange (FF6600) at the bottom and then select a 5px shadow.
In most browsers it will display these 3 choices correctly (as they are displayed in Rapidweavers' preview)
However, MSIE does not. You will end up with only 2 choices displayed correctly (the shadow and the bottom colour - orange).
So, If you use gradients and shadows for the same container make your text a different colour from the colour at the bottom of the container or it will not display in MSIE. Top -
Sorting Your ThemesAfter you have been using Rapidweaver for a while you will probably start accumulating a large number of themes from various designers. This is just a quick and easy method for sorting out your themes into whatever categories you want them sorted into.
Among these you will also probably have a few favourites that you consistently use. So, for this example you will be adding a favourites category. You can add any category you want later.
Open the ~UserName/Library/Application Support/Rapidweaver Directory. This is the directory/folder where the third party Rapidweaver Add-ons (themes, plugins, snippets, stacks etc.) are stored.
To find this directory in finder:
Open a new finder window and double click on your user account (it should be under places).
Then double click on the Library, Application Support and Rapidweaver Directories.
Once there add a new directory called Themes and then a sub-directory called "Favourites" an then move your favourite themes into it.
When you restart Rapidweaver Click on the Reveal/Hide Themes button at the top of Rapidweaver and click on the "All Themes" icon at the bottom left of the themes window. In the "Third Party Themes" click on the directory called "Favourites" to display your favourite themes.. Top -
Search Engine OptimisationAt the moment the Options theme has 4 menu locations. These are:
- navcontainer_1: Above the Page Header (For Horizontal Menus)
- navcontainer_2: Below the Page Header (For Horizontal Menus)
- navcontainer_3: Separate from the Sidebar - to the left or right of the page content (for Vertical Menus)
- navcontainer_4: Inside the Sidebar - to the left or right of the page content (for Vertical Menus)
In each of these locations a toolbar/menu is written when the page is exported.
The un-used menus are simply hidden from view.
This method of using multiple toolbar commands is used currently in at least 40 other themes.
We have had a report that this method may also result in your web-site being ranked lower in some search engines than if a single toolbar/menu had been written to the web-page.
If you find that this is the case with your web-site then there is a simple fix (It should only take a minute or two).
It involves creating a new version of the theme in which ONLY the chosen menu location will work. The other three un-used menu locations and style types will be dis-abled.
In this example we will assume that you have chosen to use "navcontainer_1" (the menu horizontal menu above the pageheader). The first thing to do is Duplicate the theme:- Click on the themes button (at the top of Rapidweaver) to show the themes.
- Right click on Options theme and select duplicate.
- Name the duplicated theme to reflect the menu location you have chosen (e.g. "Options - H Menu 1" or "Options FN - H Menu 1" if you are using a Full Navigation Theme version).
- Right Click on the duplicated theme and select "Revel Theme Contents in Finder..."
- "Double click on the contents directory and you will see 6 .html files:
- index.html,
- index-horiz_menu-1.html,
- index-horiz_menu-2.html,
- index-vert_menu.html,
- index-vert_sidebar_menu.html
- no_menus.html (if you want to make your own - kwix)
- Rename the index.html file to index-nav-all.html (ignore the Rapidweaver Error that pops up complaining that it can no longer find the index.html file)
- Rename the index-horiz-menu-1.html file to index.html
- Close all of the windows and resume your work in Rapidweaver.
This "fix" can be done for all 4 menu locations in either the Normal or Full Navigation versions of the Options theme.
If you still want to use your original Options theme web-site layout/Style (with all 4 menus) in your new single menu version then this is what you do.- Save your layout as a style and then,
- Select the New version of the Options theme that you just created (with the single working menu location) and,
- Right click on the new theme and select "Reveal Theme Contents in Finder..." .
- Open up the ~username/Library/Application Support/Rapidweaver/Theme Styles directory in a separate window.
- Find the saved theme style set (sort by descending date modified to make it easier)
- Drag the saved style into new Single Menu version of the Option themes' "Theme Styles" Directory.
- You will then be able to use the theme style set by loading it from the built-in styles.
We are working on a permanent javascript fix that will cause only the displayed/used menus to be written to an exported page.
Unfortunately, this has been complicated by:- the number of menu locations needed (4),
- the number of menu types currently used (16),
- the number of menu types to be added (unknown)
- and by our wanting to introduce multi-level menus that use both Horizontal menu locations as well as a Vertical menu location.
-
Style VariationsThis theme has many style variations which can dramatically alter the appearance of our theme. These changes can be either global or on individual pages. These styles can be accessed on the "Page Inspector" screen. To access this screen go to the "View" menu and select "Show Page Inspector". Then select the "Styles" option.
Top -
Custom LogoThe logo can be almost any size. Just match the size to the header height. The logo is also linked to the URL for your web-site.
Top -
Adding Your Own BackgroundsThe easiest way to add your own backgrounds is with RWMultitool.
The Options theme became RWMultitool compatible from V1.0.8.
Run RWMultitool and select "Compatible Themes Only". All editable images are in the "images/Editable_Images" directory.
Header images:
There are 5 single image and 5 tiled image positions. All header images should be .jpg. Images that are not .jpg will not be recognised by the theme.
It is probably best to set the header width and height with the theme styles and then use an image editing program (Photoshop, Photoshop Elements etc.) to edit the header image so that it fits these dimensions.- If your image image is not as wide as the theme width or the theme width is set to variable then use the colour picker to alter the background to match the right hand side of the image. The effect will be helped if the right hand side of the image is all one colour.
- There are 10 possible rwmultitool images. Images 1-5 are single (non-tiled) images. Images 6-10 are for tiled images.
Background Images:- There are 2 single image and 2 tiled image positions for each of the most commonly used image types (.gif, .jpg and .png).
- There are 12 RWMultitool background image slots. For each format used (.gif, .jpg, .png) there are 4 image slots (2 single images and 2 tiled images).
Adding Your Own Images:- The name you should call each image is next to the style in the page inspector. So if you select the "RWmultitool - header_01.jpg" style rename your image to "header_01.jpg".
- If possible use a utility like RWMultitool to replace the images. If you have not got this open Rapidweaver load your web-site and click on the "themes icon" at the to to reveal the themes window. Find this theme and right click on it. Then select "Reveal Theme Contents In Finder...".
- Drag and drop your Header and Background images to the "Contents/images/Editable_Images" directory.
-
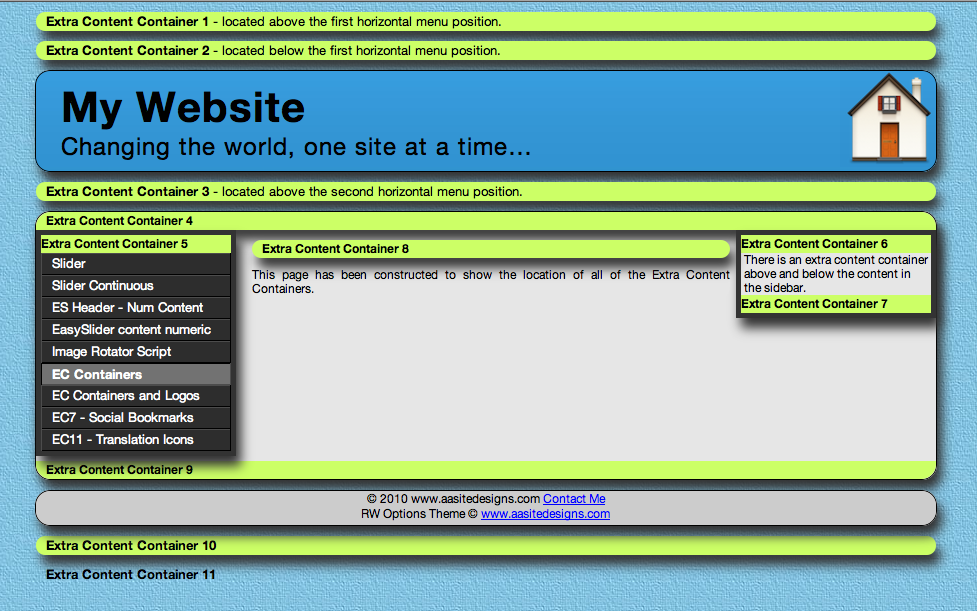
Extra Content ContainersThere are now 13 Extra Content Containers. Please click on the image to find out where they are. The font and background colours for Extra Content Container 13 cannot be altered. The background is transparent and the font is black.
MSIE Displaying Empty Extra Content Containers
Extra Content Containers were introduced in version 1.1.3. Unfortunately MSIE displayed some of these containers even when there was nothing in them.
This was fixed from Version 1.1.4. From this version all extra content containers were hidden. You now have to go to the "Extra Content Containers" Style type and select which containers you want displayed.
You can insert whatever you want into any of the extra content containers, including:Adding Code To The Extra Content Containers- scripts
- text
- ads
- images
- audio
- video
Place the code for appropriate the extra container/s below into the sidebar. Then highlight the code and select Format/Ignore Formatting (or press "APPLE ."). The code should turn a light pink. Then add your content to the container/s.
For your convenience we have provided several snippets that can be used in these containers. These include:Top- Web-site Translation Icons,
- Google Web-Site Search Form
- Todays Date
- Random Image Rotation (new image each page load)
- Social Bookmarks
- EasySlider Header Image Script (for EC3)
-
WeaverFM/Pix and MSIEIf you use weaverFM and are using the Horizontal Menu above the header then you should add a 30px margin above it. This is because the login tab extends from the top of the screen to 30px from the top of the screen and therefore disables access to any links behind it. Adding a top margin of at least 30px moves the menu below the login tab and fixes this problem.
Until Version 1.1.4 of the Options Theme a display fault occured when using MSIE to display WeaverFM and WeaverPix pages created with the Options Theme. It happened because MSIE can only display 32 CSS style links in a page. For most themes this would not have been a problem but the Options theme had:- 25 CSS style links (26 if you display the AA Site Designs credit), and
- 1 CSS iepngfix.htc link (for MSIE 6) in the index.html page.
- 4 standard Rapidweaver CSS style links (colourtag.css, handheld.css, print.css, styles.css)
This brings the total of CSS Style links to 33 (or 36 for WeaverPix) which is far more than MSIE can read and display (Stupid bloody program).
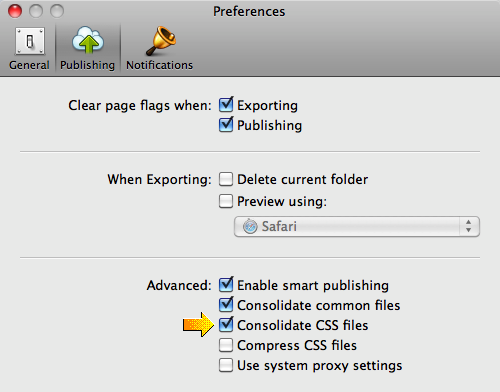
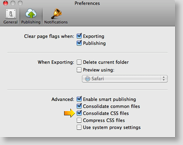
This fault has now been corrected with the release of Rapidweaver 5 as it now consolidates CSS styles (make sure this option is checked in the preferences). Top -
Header ImagesThe EasySlider Slideshow Script
To activate the Easyslider Slideshow script for your header images:- Go to the "Header Images" style and select "Easyslider Slideshow".
- Add the script below to the sidebar.
- Make sure that the path names and file names of the images match those in the scrip (otherwise the images will not display). Use the PATHTO command for images within the theme and the www.sitename.com/images/filename.jpg command for those that are not.
- Highlight the entire script in the sidebar and select "FORMAT", "IGNORE FORMATTING" (or press "APPLE ."). This makes the code change to a light pink background.
- Select the type of slideshow you want from the "EasySlider Slideshow Type" style.
- To link an image to a web address simply alter the "www.enter_your_domain_here.com" to the web address.
The Random Header Image Script
If you want a different header image to be loaded every time a page is loaded then this feature may be useful to you. The following image formats are currently supported, .gif, .jpeg, .jpg and .png.
To activate the random header images- Go to the "Header Images" style and select "Easyslider Slideshow".
- Add the script below to the sidebar.
- Make sure that the path names and file names of the images match those in the scrip (otherwise the images will not display). Use the PATHTO command for images within the theme and the www.sitename.com/images/filename.jpg command for those that are not.
- Highlight the entire script in the sidebar and select "FORMAT", "IGNORE FORMATTING" (or press "APPLE ."). This makes the code change to a light pink background.
- The type "EasySlider Slideshow Type" style is ignored when this script is used.
go to the "Header Images" style option and select "Easyslider Slideshow". Then add the script below to the sidebar. Either alter the header image names to match the names in the script or alter the names in the script to match the image names. and then copy your images to the "Editable_Images" directory. If you want to use images within the Options Theme then be sure to use the pathto command. If you want to use images from somewhere else then make sure that the image path is correct or they will not be displayed
The Random Header Image Script And Tiling Images
To stop the images tiling (for small header images) and alter the line/s of the script with the non-tiled images from /*no-repeat*/ to no-repeat.
This can be useful if your header images are smaller than the width of the page. If this is the case you may want to blend the edges of the images to match your chosen background colour.
The PATHTO Command
If you use RWMultitool then you can add images to the "images/Editable_Images" directory of the Options Theme. If you want to use these images then be sure to use the "pathto" command as this will automatically insert the correct "filepath" to the file no matter where the web-page is located. Alternatively you can always add If you want to use images from the image directory of your (or some other) web-site. If you do this you need to enter an "absolute filepath" (see images header_06.jpg....10.jpg) and make sure that the filepath is correct or they will not be displayed.
Adding Your Own Images:- The name you should call each image is next to the style in the page inspector. So if you select the "RWmultitool - header_01.jpg" style rename your image to "header_01.jpg".
- If possible use a utility like RWMultitool to replace the images. If you have not got this open Rapidweaver load your web-site and click on the "themes icon" at the to to reveal the themes window. Find this theme and right click on it. Then select "Reveal Theme Contents In Finder...".
- Drag and drop your Header and Background images to the "Contents/images/Editable_Images" directory.
- Close the directories and export your web-site.
Top -
Flash ScreensTo make a flash screen (No header, footer, sidebar or menu) open the "Header/Footer Location" style group and select "Header Hidden, Footer Hidden". Then go to the "Sidebar Location" style group and select "Sidebar Hidden, Menu Hidden".
Top -
CurvesCurves for the Header, Container and Footer should only be set to 15px if the footer is 30px or more high. To do this there should be at least 3 lines of text. Such as the:
- Site footer (set from the "Site/Show Site Setup/General" menu option.)
- Breadcrumb Trail (set from the "Site/Show Site Setup/Advanced" menu option).
- Theme Copyright Notice
Top -
Editing The index.html FileThe sections below have been included to help guide you through customising the Options Theme to suit your specific circumstances
This may be to add specific changes for a web-site (such as inserting ads, changing the language to be translated, or removing un-used menu locations).
The first thing to do is duplicate the theme in case you screw it up. This is done as follows:- Click on the themes button to show the themes.
- Right click on theme you want to work on and select duplicate.
- Rename the duplicated theme to something like "Options-website name".
To edit the actual index.html file:- Right click on the duplicated theme and select "Reveal Theme Contents in Finder".
- Go into the contents directory.
- Right clicking the index.html file and select "duplicate" (This makes it easier to return your theme to normal in case you screw it up).
- Open the index.html file in your html editor and edit the file as described in the sections below.
- Save the edited file.
Top -
Editing .plist and CSS FilesIf you know what you are doing or are learning how to design web-sites then you are welcome to alter any files that you like. Now whilst we will do everything we can to make this theme work as it is intended to work we cannot do much once you go and start altering the files. So, if you do this it is your fault if you screw it up. You should make a copy of this theme first and change the copied theme.
Our only condition is that you do not use any © Copyright files created by www.aasitedesigns.com in your theme without our permission.
Top -
Language Translation IconsUsing this snippet
- Start Rapidweaver and load your web-site.
- Open up the page info and select the sidebar tab.
- Press "Apple 5" to show the snippets
- Search for the "Translate Web-Site" snippet.
- Drag the script into the sidebar of your web-site.
- If your sidebar is in "styled mode" (button at the bottom right of the sidebar tab) you will need to highlight the script in the sidebar and press "Apple .". This causes Rapidweaver to ignore the formatting of the script.
Changing the base language
If you want to alter the language translation script to translate your language this is what you do.- Install the translations scripts that came with the theme (double click on them to install them)
- Press 5 to view the snippets list and find the snippet.
- locate the "Translate Web-Site - Template (change **** to chosen language)" snippet and double click on it to open it up for editing:
- Double click on the snippet to open up the editing window.
- Click on the code window and press a to select all of the code.
- press c to copy the code and paste it into a text editor.
- Replace all of the **** with the letters of the languge you are writing your web-site in (see below).
- Return to the snippets list and press the "+" button and name the new snippet "Translate Web-Site - Your language"
- Copy and paste the altered code into the new snippet and save it.
Currently, there are 33 Languages to Choose from"Hiding/Removing/ The Translation Icons- ar=Arabic
- bg=Bulgarian
- zh-CN=Simplified Chinese
- zh-TW=Traditional Chinese
- hr=Croatian
- cs=Czech
- da=Danish
- nl=Dutch
- en=English
- fi=Finnish
- fr=French
- tl=Filipino
- de=German
- el=Greek
- hi=Hindi
- iw=Hebrew
- it=Italian
- id=Indonesian
- ja=Japanese
- ko=Korean
- lv=Latvian
- lt=Lithuanian
- no=Norwegian
- pl=Polish
- pt=Portuguese
- ro=Romanian
- ru=Russian
- es=Spanish
- sv=Swedish
- sr=Serbian
- sk=Slovakian
- uk=Ukranian
- vi=Vietnamese
Prior to Version 1.1.3 the only way to hide the translation icons was to add this piece of code to the "Page Info/Header/CSS" tab of every page you wanted them hidden.
As of version 1.1.3 the translation icons have been converted to a snippet that can be added when you want. Top -
Converting The ThemeAs you probably know by now there are 2 versions of the "Options Theme". These are the "Normal" and "Full Navigation" versions. Apart from a single line of code in the theme.plist file each version is identical. For this reason we have decided to include instructions on how to convert on version to the other. So if you purchased one version and want a copy of the other (but are too cheap, or cannot afford to purchase both ;) ) then this is how you do it.
Full Navigation Version: Horizontal, Pop-up, pop-out and drop down menus often look / function better if the full list of sub-menu pages are viewable when hovering the mouse pointer over the main/root menu. ALL sub-menus appear when you hover over the parent menu.
Normal Version: This is most suitable for vertical - indented menus. It means that a sub-menu is only viewable once the parent menu has been selected.
If you want to change the normal version to the full navigation version then this is what you do:- Click on the themes icon in RW,
- Right click on the "Options Theme" and duplicate it.
- Then right click the copied theme and select "Reveal Theme Contents in Finder..."
- Load the theme.plist file into your favourite text editor.
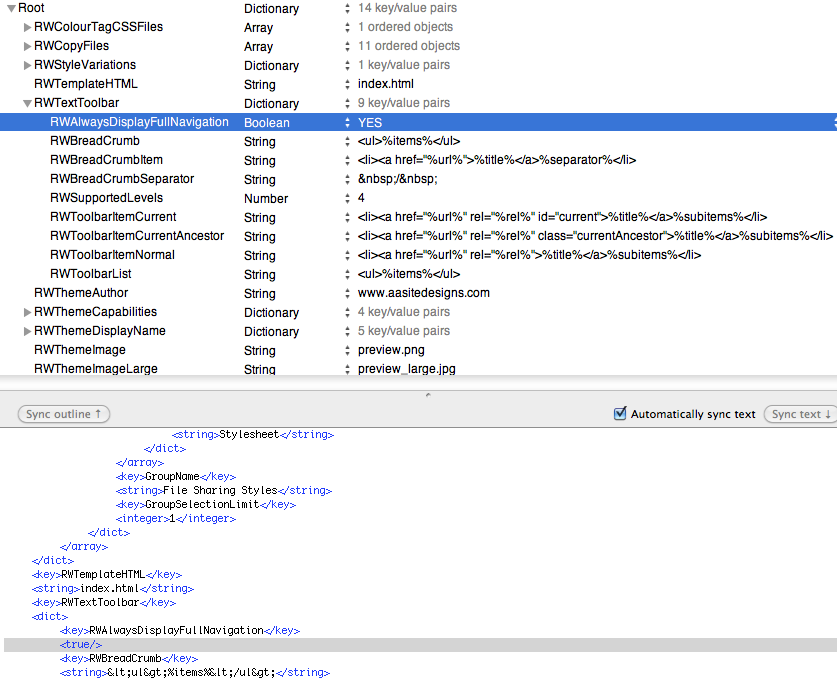
- If you use Plist Edit Pro (Preferred) find the following code:
RWAlwaysDisplayFullNavigation
no
and change this to:
RWAlwaysDisplayFullNavigation
yes. - If you use a text editor find the following code:
RWAlwaysDisplayFullNavigation
false
and change this to:
RWAlwaysDisplayFullNavigation
true.
Obviously if you want to change the full navigation version to the normal version you would change yes to no or true to false.
Plist Without Full Navigation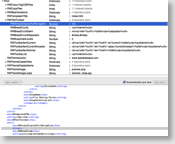 TopPlist With Full Navigation